... and a cookie, of course!
After the giant cats of last week, these are a dainty change of pace.
The un-named baby blanket is complete. It measures 30 inches x 40 inches. Cascade 220 Superwash purchased online from Wool-tyme in Ottawa. (Great service!) 4.5 mm needles. I started this project in late March with a pretty vague idea of where I wanted to end up. I am unusually happy with the end result.
And for anyone who might be curious, here's what the back of those blocks looks like. Those embroidery stitches get swallowed up in the worsted weight wool, and it is surprisingly neat back there.
It is time to move on to a new project, and it's going to be fun!!
Showing posts with label baby blanket. Show all posts
Saturday, May 23, 2015
Thursday, May 21, 2015
Progress on the baby blanket
I've been working away on the edging of the baby blanket. It seems a little strange to me that the baby blanket never got its own nickname. Almost every other project around here seems to get one. However, this particular project has always just been 'the baby blanket' in my mind. And that's the kind of weird thought that flits through a knitter's head as she's staring down a seemingly endless job like this edging. If I were Kate, I'd have told you exactly how many rows that edging was, and how many stitches that represented. However, Grandma Coco hasn't the heart for that. The number would be crushing. At any rate, without further ado, here's what the baby blanket looked like this morning as I dumped it unceremoniously out on the table for blocking.
Blocking is magic, and I'm really looking forward to seeing it all blocked once I release it from its wires and pins. I rolled it up in a dampened towel before I put the wires in, and stretched it out. Then, I spritzed it with a little more water. I'll let it air dry.
See that little bit of yarn in the lower left corner? That's all I had left of the 2nd skein of Cascade 220 Superwash.
And then, there are the waste yarn bit to remove and about a million little ends to darn in. Surprisingly, I quite like that part of the process, but it may take me a while to get that accomplished.
Blocking is magic, and I'm really looking forward to seeing it all blocked once I release it from its wires and pins. I rolled it up in a dampened towel before I put the wires in, and stretched it out. Then, I spritzed it with a little more water. I'll let it air dry.
See that little bit of yarn in the lower left corner? That's all I had left of the 2nd skein of Cascade 220 Superwash.
And then, there are the waste yarn bit to remove and about a million little ends to darn in. Surprisingly, I quite like that part of the process, but it may take me a while to get that accomplished.
Sunday, May 17, 2015
Border patrol
The squares for the baby blanket are all joined. Now it needs a nice border. I decided to add a knitted-on garter stitch border. It's 9 stitches wide, and I think it's looking pretty good. The corners are a simple case of mitring with short rows. It's just more of the same for while. Not really good blog material, but necessary. And satisfying.
Monday, May 4, 2015
I am a dope
And here is the proof.
After knitting 3 (THREE) joining strips, I flipped the work over only to find that the back of the joining strips looks really nice. I mean REALLY nice. That's when it hit me. I like the back side best, don't you?
The original strip is on the left. The upside-down strip is on the right. No contest, right? (Ignore the faint turquoise line on each side of the joining strip. That's just my lifeline that I'm leaving in place for the moment.)
In my defense, there are a lot of variations possible in this process. If you slip the stitches that need slipping in a purl-wise fashion, the result will be different from what you get if you slip them knit-wise. If you join with a slip one, knit one, pass slipped stitch over manoeuver, it will look different from joining by purling 2 stitches through the back loop (from the back). There's a lot of trial and error and a lot of just doing it the way you like best. There's no absolutely right way to do any of this.
For those who are still wondering about it, this insertion is a little like adding an edging to a knit shawl. There is no grafting involved, nor is there any sewing. I don't have anything against grafting or sewing, but I find this process very intuitive and pleasant and versatile.
Once you figure out which side you're on.
After knitting 3 (THREE) joining strips, I flipped the work over only to find that the back of the joining strips looks really nice. I mean REALLY nice. That's when it hit me. I like the back side best, don't you?
The original strip is on the left. The upside-down strip is on the right. No contest, right? (Ignore the faint turquoise line on each side of the joining strip. That's just my lifeline that I'm leaving in place for the moment.)
In my defense, there are a lot of variations possible in this process. If you slip the stitches that need slipping in a purl-wise fashion, the result will be different from what you get if you slip them knit-wise. If you join with a slip one, knit one, pass slipped stitch over manoeuver, it will look different from joining by purling 2 stitches through the back loop (from the back). There's a lot of trial and error and a lot of just doing it the way you like best. There's no absolutely right way to do any of this.
For those who are still wondering about it, this insertion is a little like adding an edging to a knit shawl. There is no grafting involved, nor is there any sewing. I don't have anything against grafting or sewing, but I find this process very intuitive and pleasant and versatile.
Once you figure out which side you're on.
Sunday, May 3, 2015
Joining the squares
I had done some rough calculations based on a bit of swatching. I had a 'sorta' plan. However, I really wouldn't know if the plan would work until I actually did it. I like that kind of spontaneity, and I like it best when it all works out.
You'll remember that each block is worked in the round. It's a squared circle. That means that the stitches at the edge of each square are live. My plan is to pick up the live stitches and join them with a strip of knitting in between. Specifically, I thought a band of garter stitch would make for an interesting textural detail.
First I tried a strip of 12 stitches, but it was too wide, I think. This strip is 6 stitches wide, and, just like Baby Bear, I think it's just about right. I started the strip provisionally, and I left the ending stitches on a length of waste yarn. That gives me live stitches on each end for joining the rows together.
I think it may just work. :)
Saturday, May 2, 2015
Fasten your seat belt
Lots to show today. Hold on! It's going to be a bumpy ride!
#10 is a raccoon
#11 is a blue elephant
#12 is a fishy
and a re-do on the chickie/ducky because, in the end, it was the only one done with a felt appliqué. I like the embroidered wing much better anyway.
So, here they all are. Twelve 8-inch squares all laid out ready for assembly.
#10 is a raccoon
#11 is a blue elephant
#12 is a fishy
and a re-do on the chickie/ducky because, in the end, it was the only one done with a felt appliqué. I like the embroidered wing much better anyway.
So, here they all are. Twelve 8-inch squares all laid out ready for assembly.
I am so excited to start putting them all together.
I sure hope they go together as well as I think they ought to.
Thursday, April 30, 2015
A butterfly
For Kate's mother, who thought babies and butterflies just go together. I think I have to agree.
This makes 9...only 3 more to go, and I can start putting them together.
Sunday, April 26, 2015
A bear, of course
Some things just stay with you, I guess. I knew I wanted a bear for the baby quilt. When I starting sketching, this is the bear who showed up. He's very Yogi Bear and BooBoo, don't you think? For better or for worse, we are the sum of our experiences.
Wednesday, April 22, 2015
Sunday, April 19, 2015
Cassie says we need a cat
You can't see it in the photo, but the copper variegated wool has a strand of glitter that is really cool. The wool is intended for socks. It's a superwash wool with a little nylon. Loops & Threads Pizzazz. I don't think I'd like socks made from it, because it's a little scratchy, but it's very nice for embroidery.
This is the 6th square for the baby blanket. Only 6 left to go. And I have 6 more sketches made. That means each of the 12 squares will have a different design. Since I'm learning as I go, and the piece is evolving because of that, this square uses a new (for me) stitch.... a chain stitch. It distorts the knitted ground less than the satin stitch. A nice addition to my repertoire.
Friday, April 17, 2015
Wednesday, April 15, 2015
A reluctant mouse
Square #4 of the baby blanket features a little mouse. The first time I stitched him, he was a little ... lumpy? The fabric was pretty stiff. :(
Stitching him in the worsted weight Cascade 220 Superwash didn't work so well. I really needed a lighter weight yarn. I split the 4 plies and tried stitching with just 2.
Much better.
Stitching him in the worsted weight Cascade 220 Superwash didn't work so well. I really needed a lighter weight yarn. I split the 4 plies and tried stitching with just 2.
Much better.
Sunday, April 12, 2015
Slurpy Dog
Square #3.
Inspired by Duke. He may be long gone, but he still pops up from time to time. Never to be forgotten.
Thursday, April 9, 2015
More of the same
I can't get enough of that dusky pink/coral and green combination. Also, if you look closely, you'll see the 2nd square for the baby blanket is finished.
A chick. I'm lovin' how the squared circle is making frames on each square. Uhhh....now that I see it on the monitor, I think it may need just one more leaf...
Sunday, April 5, 2015
Block 1, done
Last night when I finished the embroidery on this block, and liberated it from its clamps, I was disappointed. In spite of that little square being tightly held by the clamps, it was slightly distorted once freed. :( During the night, I considered my options (when I should have been sleeping). This morning, before I did anything more drastic, I gave it a quick 2nd chance steam blocking, with the square face-down on a thick bath towel. I was pleasantly surprised by the result. I think it's OK. That means Block #1 of 16 is done. I have not yet decided if every block will be embroidered. There have to be a few mysteries left unsolved, or the project will be very dull.
This block shows off one of the reasons I so wanted to knit the squares in the round, in the first place. The purple rounds are done in double knitting, with a little checkerboard effect. Because of the random increases every other round, I can't do the major double knitting patterns I had hoped to do, but the little checkerboards make the block interesting, I think.
Now, what's next? Little birdies?
Saturday, April 4, 2015
Blankets for babies
Moving right along on the baby blanket. Now that I have the 8-inch squares knit-in-the-round figured out, I want to be sure the embroidery part is going to work. Here's the first one underway. You can sort of see the used dryer sheet I'm using as a stabilizer and also, to transfer the embroidery lines. The clamps were Kate's idea, to hold everything nice and snug while I embroider. It's good to have geniuses for friends. :)
Saturday, March 28, 2015
Sometimes the world turns in mysterious ways
The last time I wrote about my attempt to create a square by knitting in the round, if you'll remember, it was to report a total failure. I had an inkling of where I wanted to go, but the rest was pretty fuzzy.
All I want is a simple square that I can embroider and join with other similar squares to make a sweet baby blanket. That's not so much to ask for is it? I want to use Cascade 220 Superwash (worsted weight) with 4.5mm needles. The square needs to be sturdy. And it needs to WANT to be a square.
So, the morning after my last failed experiment, wherein I added extra balanced increases and got 4 extra 'corners' (Yikes! More of a spiky circle, than a square!) I got an email describing an antique mitten. The author wrote that the knitter had increased randomly, so that you could hardly tell where the increases occurred. Well, now. That's a thought, isn't it?
So, with the universe speaking to me so directly, and my tin foil hat pulled down tightly on my head, I set about my next experiment. With the stitches divided on 4 needles, so that each needle represents one side of my would-be square, I increased 1 stitch just inside the first and last stitches of each needle on every other row. PLUS I increased one stitch randomly, at the same time, somewhere in the middle of the stitches of each needle. A total of 3 extra stitches every other row (which is the increase I calculated last time). I used the increase where you pick up the stitch from the row below, because it's almost invisible. So, when I got to Round 28 (which is 4 in. of knitting from the cast-on centre), I had 43 stitches (which measure 8 in., more or less) on each needle. I had been thinking about 12-inch squares, and then 10-inch squares, but I've finally settled on 8-inch squares, because I think they'll better suit the embroidery I have in mind. I'll just have to make more of them. (Win some/lose some.)
So, here's the square after I steam-blocked it. It still has the blocking wires in the live edge stitches, because I'm still nervous it's not going to work.
And here it is with the wires removed. Is it not a thing of beauty???!! I flipped it around, and waved it in the breeze, and STILL it wants to be the square it needs to be. I am not worried that the live edge stitches want to curl a little. That will solve itself when it's joined to its neighbour. But the sides are square and true.
Maybe it's because this was a struggle, or maybe it's because it's a triumph of math for someone who can't even keep a simple phone number in her brain long enough to write it down, but this seems like a massive victory. And I'm smart enough to know this is where I need to leave the project for today.
All I want is a simple square that I can embroider and join with other similar squares to make a sweet baby blanket. That's not so much to ask for is it? I want to use Cascade 220 Superwash (worsted weight) with 4.5mm needles. The square needs to be sturdy. And it needs to WANT to be a square.
So, the morning after my last failed experiment, wherein I added extra balanced increases and got 4 extra 'corners' (Yikes! More of a spiky circle, than a square!) I got an email describing an antique mitten. The author wrote that the knitter had increased randomly, so that you could hardly tell where the increases occurred. Well, now. That's a thought, isn't it?
So, with the universe speaking to me so directly, and my tin foil hat pulled down tightly on my head, I set about my next experiment. With the stitches divided on 4 needles, so that each needle represents one side of my would-be square, I increased 1 stitch just inside the first and last stitches of each needle on every other row. PLUS I increased one stitch randomly, at the same time, somewhere in the middle of the stitches of each needle. A total of 3 extra stitches every other row (which is the increase I calculated last time). I used the increase where you pick up the stitch from the row below, because it's almost invisible. So, when I got to Round 28 (which is 4 in. of knitting from the cast-on centre), I had 43 stitches (which measure 8 in., more or less) on each needle. I had been thinking about 12-inch squares, and then 10-inch squares, but I've finally settled on 8-inch squares, because I think they'll better suit the embroidery I have in mind. I'll just have to make more of them. (Win some/lose some.)
So, here's the square after I steam-blocked it. It still has the blocking wires in the live edge stitches, because I'm still nervous it's not going to work.
And here it is with the wires removed. Is it not a thing of beauty???!! I flipped it around, and waved it in the breeze, and STILL it wants to be the square it needs to be. I am not worried that the live edge stitches want to curl a little. That will solve itself when it's joined to its neighbour. But the sides are square and true.
Maybe it's because this was a struggle, or maybe it's because it's a triumph of math for someone who can't even keep a simple phone number in her brain long enough to write it down, but this seems like a massive victory. And I'm smart enough to know this is where I need to leave the project for today.
Friday, March 27, 2015
Reporting back
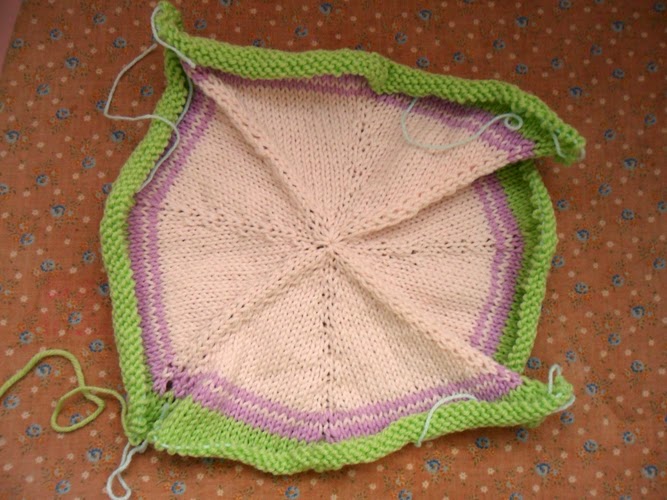
I promised to report on my squared circle trial. I had hoped it would be with an amazing "Ta-DA!, I DID it!" Unfortunately, I'm still struggling. :( All in a day's work.
First, I'll distract you with a photo of my lovely assistant demonstrating the square
while it was still on my needles. Look carefully, and you'll see my feet.
Yup. She's on my lap.
Next, a photo of the square off the needles.
I'm nervous about that point that's forming on each side.
But, here it is blocking. It didn't need much muscle to form the square,
and there were lots of stitches at the perimeter. No pulling this time.
It's still looks promising.
Here's the stitch-maps chart of what I tried.
I was a little worried by the way it tends to form a point
in the middle of this string of stitches (which represents one side of the square),
but I hoped it would just all work out.
If you remember, I determined I needed to increase 3 stitches every other round.
That means 6 stitches every 4 rounds.
Click on the Stitch-maps link to see the instructions written out, if you like.
Or don't. It didn't work out the way I'd hoped.
Once blocked, the square still doesn't want to be a square.
I need a good, solid square to embroider on.
I'm still working on finding one.
Tuesday, March 24, 2015
Squaresville
Sooooo, did you happen to notice that the blocked square wasn't exactly square? Yeah, me, too. :( And even though I blocked it really hard, it still wowed on the sides. Double :( :(.
Blocking the square as hard as I did had an additional downside. The fabric is way less dense than I intended, and the colourwork especially, looks all stretched out.
I thought for a while the problem might be the corner increases. I was doing Kf&b (Knit through both the front and back loops) of each end stitch. That's not a balanced increase, since each new stitch appears to the left of the original stitch. In my mind, these are 4 equilateral triangles (the 4 wedges that make up the squared-off circle). And they must be symmetric.
Instead of Kf&b, I tried to put a leaning decrease one stitch in from the edge of each side. I won't bother to describe it in any more detail here, because it didn't work. Oh, I like the symmetry of it, but the sides still wowed.
A little math seems to be required, and a little more thought.
For the final block to end up at 12 inches, the radius must be 6 inches. OK. Got that. The inner angle of the wedge must be 90°. I think with the blocking, we've got that. BUT the outside edge of the wedge (the perimeter of the square) should be 12 inches, too. I STRETCHED it to 12 inches with the hard blocking, but should blocking (like marriage) really be that hard? I don't think so.
And that's what brings us to the question of gauge. With Cascade 220 Superwash in my hot little hands, with 4.5 mm needles, I am getting a stitch gauge of 5.5 stitches/inch. So, for a 12 inch outside edge, I ought to have 66 stitches (for each wedge). And what do I have? Only 44.
I forgot about row gauge. I am getting 7 rows/in. That means to achieve 6 inches of knitting, I need to do 42 rows. If I started with 3 stitches, I need to increase 62 stitches over 44 rows. Or, more precisely, over 21 rows, since I increase on alternate rows. This is where my left brain moves over so my right brain can shout, "62 divided by 21 is VERY CLOSE to THREEEEE!"
And that, Knitting Touristas to the Kingdom, is what I'm going to try next. I will make 3 increases in alternate rows. A left leaning increase one stitch in from the starting point. A right leaning increase one stitch before the last stitch. AND, wait for it........one increase right dead centre in the square. It needs to be symmetrical though. Hmmmmm......
I don't think I can visualize this until I actually get the wool on my needles. Stay tuned.
Blocking the square as hard as I did had an additional downside. The fabric is way less dense than I intended, and the colourwork especially, looks all stretched out.
I thought for a while the problem might be the corner increases. I was doing Kf&b (Knit through both the front and back loops) of each end stitch. That's not a balanced increase, since each new stitch appears to the left of the original stitch. In my mind, these are 4 equilateral triangles (the 4 wedges that make up the squared-off circle). And they must be symmetric.
Instead of Kf&b, I tried to put a leaning decrease one stitch in from the edge of each side. I won't bother to describe it in any more detail here, because it didn't work. Oh, I like the symmetry of it, but the sides still wowed.
A little math seems to be required, and a little more thought.
For the final block to end up at 12 inches, the radius must be 6 inches. OK. Got that. The inner angle of the wedge must be 90°. I think with the blocking, we've got that. BUT the outside edge of the wedge (the perimeter of the square) should be 12 inches, too. I STRETCHED it to 12 inches with the hard blocking, but should blocking (like marriage) really be that hard? I don't think so.
And that's what brings us to the question of gauge. With Cascade 220 Superwash in my hot little hands, with 4.5 mm needles, I am getting a stitch gauge of 5.5 stitches/inch. So, for a 12 inch outside edge, I ought to have 66 stitches (for each wedge). And what do I have? Only 44.
I forgot about row gauge. I am getting 7 rows/in. That means to achieve 6 inches of knitting, I need to do 42 rows. If I started with 3 stitches, I need to increase 62 stitches over 44 rows. Or, more precisely, over 21 rows, since I increase on alternate rows. This is where my left brain moves over so my right brain can shout, "62 divided by 21 is VERY CLOSE to THREEEEE!"
And that, Knitting Touristas to the Kingdom, is what I'm going to try next. I will make 3 increases in alternate rows. A left leaning increase one stitch in from the starting point. A right leaning increase one stitch before the last stitch. AND, wait for it........one increase right dead centre in the square. It needs to be symmetrical though. Hmmmmm......
I don't think I can visualize this until I actually get the wool on my needles. Stay tuned.
Sunday, March 22, 2015
New Directions
With winter and snow and mittens in the rear view mirror, looking ahead to spring ...
... with a new project. I have a very loose plan, and lots of Cascade 220 Superwash wool to play with. Let's start with squares knit in the round. Knitted quilt blocks, really. Here's the first one:
Blocking is magic, isn't it?
... with a new project. I have a very loose plan, and lots of Cascade 220 Superwash wool to play with. Let's start with squares knit in the round. Knitted quilt blocks, really. Here's the first one:
Blocking is magic, isn't it?
Subscribe to:
Posts (Atom)