Friday, May 18, 2012

With fresh eyes

We have such lovely visitors here in the Kingdom and many of them leave thoughtful and helpful comments. One of them is Maria who suggested we put the last bracelet away for a day or 2 so we could see it clearly with fresh eyes. What a great idea! We do that routinely with our drawings.


There's something in our brains that wants to make sense of things. Unfortunately, that part of our brain can sometimes get in the way by not allowing us to see things as they really are. So, we sent the green bracelet off for a tiny time out. When he emerged, calmer and contrite, we could see right away it wasn't the choice of colours or even the choice of beads. It was the placement.


The little, yellow beads were just lost in that great chasm between the focal beads and the large white beads.
See the difference?
Now, the yellow beads can shine. The focal beads are ones we made from polymer clay. They are vibrant and joyful. This is a bracelet for someone who is happy! A bracelet for a celebration. It measures 7 3/4 inches long, with a beaded loop and a single glass bead for the closure.

Thank you to everyone who offered input. We appreciate your comments.


Wednesday, May 16, 2012

Baby Steps

We have our WhirlyGiggle quilt all ready and we're determined to quilt it by machine ... and not in straight lines either. We really want to learn to do this Free Motion stuff we see everybody else doing. Every time we get ready to start, we chicken out, it seems. We set our machine up for free motion and test drove the spare block we had leftover. Oh, boy, the learning curve is steep. And we are so very unforgiving of ourself.   (In truth, Grandma Coco doesn't see what all the fuss is about. It's Cheryl who's dragging her feet.)

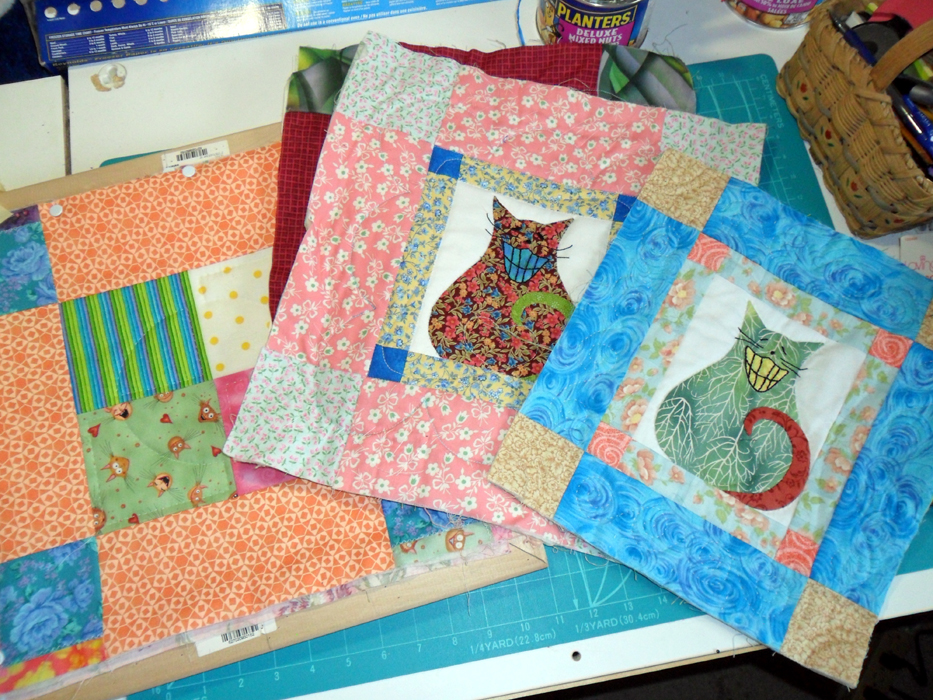
We finally dug out a UFO that we started a while ago. We planned a quilt-as-you-go quilt. We like quilt-as-you-go but we have to admit it was a sort of stop gap measure between hand-quilting and actually getting the hang of machine quilting (which seemed pretty much unattainable back then).


We've already flip-flopped around on this one. We started out machine quilting with the feed dogs up, starting and stopping and pivoting as needed. Very time consuming. We did a little hand-quilting on a small frame which was actually the frame for an artist's canvas. Good idea but ... Very time consuming. Result? UFO. And now we all know why. So, now that we've got a little of this and a little of that anyway, why not go all the way and use these blocks to practice our FMQing on?

Say Cheese Copyright  © 2012 Cheryl Coville


So, here's the deal. There are 11 hand appliquéd, hand embroidered Say Cheese cat blocks and 1 hand appliquéd portrait of our long-ago dog, Daisy. These will alternate with 12 scrappy patchwork blocks to form a quilt 56 1/4 inches x 60 inches. The animal blocks will all have one backing fabric and the scrappy blocks will have a coordinating backing so the back of the quilt will be a checkerboard.

Daisy Copyright © Cheryl Coville 2012
That sounds like a plan. Off we go. Any words of wisdom will be gratefully received. 


Linking up to the Needle and Thread Network again. 
Check out all the great Canadian craftspeople.


Monday, May 14, 2012

Advice needed


Sometimes the beads seem to choose themselves. Sometimes they just don't want to cooperate. We're not sure about this one. The colours in this photo are pretty much spot on (on our monitor). Would love to hear what you all think. Is it the yellow that's just not strong enough? Hmmmm....


Sunday, May 13, 2012

Some pretty things

Apple blossoms under a perfectly blue May sky


Flower cookies for a friend


A spring-inspired bracelet


Saturday, May 12, 2012

Say "Hello" to Paddy!

Cassie's been feeling a little low since all the monkeys went to their new homes. This being an only child isn't what it's cracked up to be.


Fortunately, when she got up this morning, this little fellow was waiting for her.

"Hey, sleepyhead! What took you so long!"

He says his name is Paddy. What's he wearing? Why, a backpack, of course. How else would he carry all his belongings?


If you've made a monkey from Anita Wilschut's pattern and he needs a backpack, here's how we did ours.

You can use our template, if you'd like. Cut one from felt or felted wool or maybe even polar fleece (anything that won't fray) and cut 2 straps that measure 1/2 inch x 7 1/2 inches.  We used an ordinary paper punch to punch the holes that you see on the template.


We cut some wool about 36 inches long, took the 2 cut ends in our left hand and twisted it with our thumb in the mid-point. Twist, twist, twist until there's a fair amount of twisting going on. Take both ends of this twisted piece and put them together to make a nice cord. Knot both ends and feed it through the holes just like in the photo.

Position the straps as shown and fold on the line on the template (It's about 4 inches from the bottom.) with the right sides together. Stitch along both sides with a very narrow seam allowance. 

Next, square off the corners of the bottom of the backpack just like you would for a purse. Stitch about an inch from the corner.


Turn the backpack right side out and feed the cord through the paper punch hole in the top. The tension of the fabric will keep it closed. No buttons to worry about with little kids ... or monkeys.

And that's it! A backpack for a little scamp of a monkey to keep his stuff in. Oh, and did you notice what he was sitting on? That's our WhirlyGiggle quilt!!! We bet he's the one who has hidden our safety pins.


~ Just monkeyin' around,

Friday, May 11, 2012

Ravelry and Craftsy stuff

Ravelry is running a contest right now to celebrate their 5th anniversary. They asked for design submissions for an image to put on a project bag. This is our entry:


There are a LOT of very good designs in the running. If you're signed up for Ravelry, you can choose your favourite until May 14th at midnight EST.

As well, over on Craftsy ...
We've uploaded a .PDF of our Corduroy Roads Socks. It's freeeeee! Help yourself, if you'd like.


Thursday, May 10, 2012

Finishing the Corduroy Roads Sock

AND, we're back! To the Corduroy Roads Sock, that is.

Detail: The Heel (being a ribbed stitch, the heel flap is slightly stretchy)


Now, where were we? Oh, yes. We'd just turned the heel and reduced at the gusset to finish the foot on the same number of stitches we had for the leg... 60 for the large size OR 54 for the small size.

Detail: The Cuffs (with their fabulous tubular cast-on)


We continue to knit round and round until the foot measures 6 inches from the edge of the heel flap (where we picked up stitches for the foot) for the large size OR 4 inches for the small size. This will give us a finished foot length of approximately 10 inches for the large size OR 8 inches for the small size. If you're following along and you need to adjust for a slightly shorter or longer foot, do it now.

We're going to do a Round Toe which is our (current) favourite toe treatment. The instructions, in this case, are the same for either size.

Rnd 1: * K4, K2Tog, rep from * to end of round.
Rnds 2-5: Knit
Rnd 6: * K3, K2Tog, rep from * to end of round.
Rnds 7-9: Knit
Rnd 10: * K2, K2Tog, rep from * to end of round.
Rnds 11 & 12: Knit
Rnd 13: * K1, K2Tog, rep from * to end of round.
Rnd 14: Knit
Rnd 15: *K2Tog, rep from * to end of round.

For large size only, next round: (K1, K2Tog) 3 times, K1.

Cut the yarn leaving a 10 inch tail and draw the tail through all the remaining stitches. Pull up tight and fasten. Darn in all the ends.

Two Full Pairs!


That's it! Thank you for helping us get our second sock completed. They have already been claimed by Mr. Coco (who knows a handsome sock when he sees one.)


We can't shake the feeling that there's much more to explore on the heel flap of the simple sock.